Wednesday, 25 October 2017

Win keyboard Shortcuts

Win keyboard Shortcuts


  • ⊞ Win — opens the Start Menu, in Windows 8.1 — opens the previous window;
  • ⊞ Win + A — opens the Action Center (in Windows 10);
  • ⊞ Win + B — selects the first icon in the Notification Area (you can then switch between the icons using the arrow keys);
  • ⊞ Win + Ctrl + B — switches to a program indicating a new message in the Notification Area;
  • ⊞ Win + C shows the Charm Bar (in Windows 8 and 8.1); in Windows 10 it opens Cortana (if you’re using a supported language);
  • ⊞ Win + D — shows the desktop (immediately minimizes all the opened windows);
  • ⊞ Win + E — opens Windows Explorer; in Windows 10 opens the Quick Launch by default;
  • ⊞ Win + F — opens ’Find files and folders’;
  • ⊞ Win + Ctrl + F — opens ’Find computers’;
  • ⊞ Win + G — brings all gadgets to the foreground that are in process (only in Windows 7 and Vista); opens the Game bar in Windows 10;
  • ⊞ Win + K — opens a new Start menu — Connections (in Windows 8 and 8.1);
  • ⊞ Win + L — changes user or locks the workstation;
  • ⊞ Win + M — minimizes all windows;
  • ⊞ Win + ⇧ Shift + M — restores windows that were minimized;
  • ⊞ Win + O — locks device orientation (disables the gyroscope function on tablets);
  • ⊞ Win + P — switches operating modes to an external monitor/projector (only in Windows 7 and newer);
  • ⊞ Win + Q — opens Search charm for installed apps (checked in Windows 8);
  • ⊞ Win + R — opens the ’Run dialog’ box;
  • ⊞ Win + T — switches focus to the Taskbar (only in Windows 7 and newer);
  • ⊞ Win + U — opens the Utility Manager;
  • ⊞ Win + W — opens Windows Ink Workspace (notes, screenshots);
  • ⊞ Win + X — opens the Windows Mobile Application Center (only for mobile computers in Windows Vista and 7);
  • ⊞ Win + Y — starts Yahoo! Messenger (if installed).

Wednesday, 1 July 2015

Saturday, 20 June 2015

Windows: More than 100 Keyboard Shortcuts


More than 100 Keyboard Shortcuts

Keyboard Shorcuts (Microsoft Windows)
1. CTRL+C (Copy)
2. CTRL+X (Cut)
3. CTRL+V (Paste)
4. CTRL+Z (Undo)
5. DELETE (Delete)
6. SHIFT+DELETE (Delete the selected item permanently without placing the item in the Recycle Bin)
7. CTRL while dragging an item (Copy the selected item)
8. CTRL+SHIFT while dragging an item (Create a shortcut to the selected item)
9. F2 key (Rename the selected item)
10. CTRL+RIGHT ARROW (Move the insertion point to the beginning of the next word)
11. CTRL+LEFT ARROW (Move the insertion point to the beginning of the previous word)
12. CTRL+DOWN ARROW (Move the insertion point to the beginning of the next paragraph)
13. CTRL+UP ARROW (Move the insertion point to the beginning of the previous paragraph)
14. CTRL+SHIFT with any of the arrow keys (Highlight a block of text)
SHIFT with any of the arrow keys (Select more than one item in a window or on the desktop, or select text in a document)
15. CTRL+A (Select all)
16. F3 key (Search for a file or a folder)
17. ALT+ENTER (View the properties for the selected item)
18. ALT+F4 (Close the active item, or quit the active program)
19. ALT+ENTER (Display the properties of the selected object)
20. ALT+SPACEBAR (Open the shortcut menu for the active window)
21. CTRL+F4 (Close the active document in programs that enable you to have multiple documents open simultaneously)
22. ALT+TAB (Switch between the open items)
23. ALT+ESC (Cycle through items in the order that they had been opened)
24. F6 key (Cycle through the screen elements in a window or on the desktop)
25. F4 key (Display the Address bar list in My Computer or Windows Explorer)
26. SHIFT+F10 (Display the shortcut menu for the selected item)
27. ALT+SPACEBAR (Display the System menu for the active window)
28. CTRL+ESC (Display the Start menu)
29. ALT+Underlined letter in a menu name (Display the corresponding menu) Underlined letter in a command name on an open menu (Perform the corresponding command)
30. F10 key (Activate the menu bar in the active program)
31. RIGHT ARROW (Open the next menu to the right, or open a submenu)
32. LEFT ARROW (Open the next menu to the left, or close a submenu)
33. F5 key (Update the active window)
34. BACKSPACE (View the folder onelevel up in My Computer or Windows Explorer)
35. ESC (Cancel the current task)
36. SHIFT when you insert a CD-ROMinto the CD-ROM drive (Prevent the CD-ROM from automatically playing)
Dialog Box - Keyboard Shortcuts.
1. CTRL+TAB (Move forward through the tabs)
2. CTRL+SHIFT+TAB (Move backward through the tabs)
3. TAB (Move forward through the options)
4. SHIFT+TAB (Move backward through the options)
5. ALT+Underlined letter (Perform the corresponding command or select the corresponding option)
6. ENTER (Perform the command for the active option or button)
7. SPACEBAR (Select or clear the check box if the active option is a check box)
8. Arrow keys (Select a button if the active option is a group of option buttons)
9. F1 key (Display Help)
10. F4 key (Display the items in the active list)
11. BACKSPACE (Open a folder one level up if a folder is selected in the Save As or Open dialog box)
Microsoft Natural Keyboard Shortcuts.
1. Windows Logo (Display or hide the Start menu)
2. Windows Logo+BREAK (Display the System Properties dialog box)
3. Windows Logo+D (Display the desktop)
4. Windows Logo+M (Minimize all of the windows)
5. Windows Logo+SHIFT+M (Restorethe minimized windows)
6. Windows Logo+E (Open My Computer)
7. Windows Logo+F (Search for a file or a folder)
8. CTRL+Windows Logo+F (Search for computers)
9. Windows Logo+F1 (Display Windows Help)
10. Windows Logo+ L (Lock the keyboard)
11. Windows Logo+R (Open the Run dialog box)
12. Windows Logo+U (Open Utility Manager)
13. Accessibility Keyboard Shortcuts
14. Right SHIFT for eight seconds (Switch FilterKeys either on or off)
15. Left ALT+left SHIFT+PRINT SCREEN (Switch High Contrast either on or off)
16. Left ALT+left SHIFT+NUM LOCK (Switch the MouseKeys either on or off)
17. SHIFT five times (Switch the StickyKeys either on or off)
18. NUM LOCK for five seconds (Switch the ToggleKeys either on or off)
19. Windows Logo +U (Open Utility Manager)
20. Windows Explorer Keyboard Shortcuts
21. END (Display the bottom of the active window)
22. HOME (Display the top of the active window)
23. NUM LOCK+Asterisk sign (*) (Display all of the subfolders that are under the selected folder)
24. NUM LOCK+Plus sign (+) (Display the contents of the selected folder)
MMC Console Windows Shortcut keys.
1. SHIFT+F10 (Display the Action shortcut menu for the selected item)
2. F1 key (Open the Help topic, if any, for the selected item)
3. F5 key (Update the content of all console windows)
4. CTRL+F10 (Maximize the active console window)
5. CTRL+F5 (Restore the active console window)
6. ALT+ENTER (Display the Properties dialog box, if any, for theselected item)
7. F2 key (Rename the selected item)
8. CTRL+F4 (Close the active console window. When a console has only one console window, this shortcut closes the console)
Remote Desktop Connection Navigation.
1. CTRL+ALT+END (Open the Microsoft Windows NT Security dialog box)
2. ALT+PAGE UP (Switch between programs from left to right)
3. ALT+PAGE DOWN (Switch between programs from right to left)
4. ALT+INSERT (Cycle through the programs in most recently used order)
5. ALT+HOME (Display the Start menu)
6. CTRL+ALT+BREAK (Switch the client computer between a window and a full screen)
7. ALT+DELETE (Display the Windows menu)
8. CTRL+ALT+Minus sign (-) (Place a snapshot of the active window in the client on the Terminal server clipboard and provide the same functionality as pressing PRINT SCREEN on a local computer.)
9. CTRL+ALT+Plus sign (+) (Place asnapshot of the entire client window area on the Terminal server clipboardand provide the same functionality aspressing ALT+PRINT SCREEN on a local computer.)

Microsoft Internet Explorer Keyboard Shortcuts.
1. CTRL+B (Open the Organize Favorites dialog box)
2. CTRL+E (Open the Search bar)
3. CTRL+F (Start the Find utility)
4. CTRL+H (Open the History bar)
5. CTRL+I (Open the Favorites bar)
6. CTRL+L (Open the Open dialog box)
7. CTRL+N (Start another instance of the browser with the same Web address)
8. CTRL+O (Open the Open dialog box,the same as CTRL+L)
9. CTRL+P (Open the Print dialog box)
10. CTRL+R (Update the current Web)

Tuesday, 10 March 2015

Data Recovery Services

Data Recovery Services

  • Laptop Data Recovery
  • Raid Data Recovery
  • Hard Drive Data Recovery
  • Deletion Data Recovery
  • Formatted Data Recovery
  • Hard Drive Repair
  • Data Recovery & Restore
  • PST Restoration
  • File Fix / Repair / Recovery
  • Corrupted Data Recovery Fix
  • Flash Drive Data Recovery
  • SSD Solid State Data Recovery
  • Linux Data Recovery
  • Memory Card Data Recovery
  • USB Data Recovery
  • CD Data Recovery / External Drive Data Recovery

We can also recover lost partitions, fix master boot records accidently formatted hard disk drives (storage devices), virus damaged files as well as recovering deleted emails, photos,documents and corrupted microsoft outlook PST files. We have powerful Windows and Linux tools to recover your data.

Wednesday, 21 January 2015

Simple Solution: Windows Action Center Message - Antispyware and Virus - OFF?

Well i came across this message saying that anti spyware and virus protection were turned off. This happened after updating from windows 8 to windows 8.1


The Windows defender was an easy fix, just had to open the program up and click the turn on button. I then ran a full scan to make sure everything was good.

The anti-virus on the other hand was on saying all shields on, firewall active and that i was protected - see below

How i resolved this problem:

It was very simple really -

1 Right click the avast icon on the bottom.
2 Click settings avast shields control.
3 Click turn of until reboot.
4 Reboot.

Issue solved.

Sunday, 19 October 2014

Anti-virus vs Malware

A great break down as to what viruses and Malware are, and why you should have an Anti-virus as well as malware protection on your PC.


DurbanGeek recommends Malwarebytes and Super anti Spyware

Tuesday, 5 August 2014

Resolve Internet Explorer Crashes due to Avast Add-Ons


Internet Explorer  is prone to crashes. Most of the time  crashes takes place due to add-ons. Users who are facing constant crashes might want to start IE in safe mode (add-ons disabled).

If you can open your browser normally go straight to tools, manage add-ons and disable the problematic add-on. If you cannot open up Internet Explorer at all  follow these steps directly below 

 Below is 2 methods of how to  Start Internet explorer (no-addons):


Type “iexplore -extoff” without the quotes in Start Search and hit Enter.


OR
This is the most simplest method. Simply type "Internet Explorer" in Start Search and you will find the one which can run without the add-ons.


Once you have IE (no-add-ons) open click on 'Tools' in the menu, then click on 'manage add-ons', A window will popup titled 'Manage Add-ons'.... Make sure tools and extensions is selected in the left plane and once selected you should see all the add-ons on the right. You can right click on each add-on and disable the one causing the problem or if you are not sure disable them all and enable one at a time until your browser crashes again. In this case we know that the problem is the Avast Add-on so below is the instructions to fix the Avast add-on issue.
1. Next we will turn off the avast self defence:
- Start avast! program- Click on the right side on SETTINGS- Choose "Troubleshooting" and untick option "Enable avast! self-defense module"

2. We now need to locate

 c:\ProgramData\AVAST Software\Avast\log\wrcbrokerx64.log

3. We then need to delete a file in Root c:\ProgramData (this by default is a hidden directory) 
To unhide this folder  click on the c:\ drive  then select 'Tools' and then 'Folder Options' Click the 'View' tab  and in the advanced settings under "Hidden files and folders'  put a check in 'Show hidden files, folders, and drives'
In the Root directory c:\  you should now see the ProgramData folder. 

4. Now navigate to the 'log' sub-directory.

c:\ProgramData\AVAST Software\Avast\log\wrcbrokerx64.log


5. Delete the file:  wrcbrokerx64.log


6. Re-enable the Avast self defense again:
- Start avast! program
- Click on the right side on SETTINGS
- Choose "Troubleshooting" and tick option "Enable avast! self-defense module"

7.) Start Internet Explorer normally then go back to manage add-ons as we did above and enable Avast add-on 

Friday, 30 May 2014

Chrome Tips & Tricks


Drag Multiple Tabs at Once


Most people are familiar with the ability to drag and drop Chrome tabs into their own browser windows, or mix and match them between browser windows, but they may not know that it can be done with more than one tab at a time. Just hold down the Shift key and click on all the tabs you wish to move and you can move them as one. If you're on a Mac, hold the Command key.                          

Your Omnibox Is a Calculator


As you may or may not know, Google will calculate basic math in the search bar. However, did you know that you can access a similar math function in your omnibox without ever going to Google.com? Just type in a basic math problem and the correct answer will appear in the suggestions below the omnibox without pressing enter (as you have to do on Google.com).

This handy little trick appears only to work if your default omnibox search is Google—you won't get an answer if your default is, say Yahoo or Bing. It also doesn't appear to work if you are typing into an incognito window, no matter what your default browser. 

Your Omnibox Is a Unit Converter


Your omnibox can also perform Google-like unit conversions without going to Google. As with the calculator, the correct answer will appear in the suggestions below without ever hitting enter. As you type, Chrome will automatically convert your number into a unit that you may or may not want. So, if you type "9 inches," Chrome may automatically suggest conversion rate to centimeters. If you want a different conversion, just type an equals sign with the conversion you do want (e.g. "9 inches = km" or "9 inches = mm" or "9 inches squared = m squared").

Once again, this particular function only appears to work if Google is your default omnibox search engine and it won't work in incognito mode.
                       

Zoom In and Zoom Out


On a PC, you can zoom in or out on a page by pressing Control while turn your scroll wheel up or down (or by pressing Control-Plus or Control-Minus). Once you zoom in or out from the default, a magnifying glass icon will appear in the right side of the omnibox. You can click the magnifying glass to manually zoom in or out or hit "Reset to default" to return to the normal 100 percent view. Conversely, you can also click Control-0 to return to the default.

On a Mac, you can zoom in and out by pressing Command-plus or Command-minus. Pressing Command-0 function will still bring you back to default.                
       

Drag to Search


Highlighting a word and performing a drag and drop is fundamentally the same as performing a cut and paste, so it stands to reason that you could just highlight a word or phrase and drag it into the omnibox to perform a Web search. Conversely, you can also just right click on highlighted word or phrase and you will prompt a pop-up option to conduct a Google search (on a Mac, Control-click on a highlighted word).                         


Drag a URL to the Bookmarks Bar


If you come across a website you will want continual and easy access to, you can quickly add it to your Bookmarks Bar by highlighting the URL and dragging directly down to the Bar. Boom. You can edit it later if you want to change the name. You can drag a URL in from sources other than Chrome as well.                        

Navigate Up and Down Using Key Commands


You can use the spacebar to scroll down on any webpage, and you can scroll back up by pressing Shift and the spacebar.                        

Open Accidentally Closed Tabs


Have you ever mistakenly closed a tab? We all have. BUT thankfully Chrome is a forgiving browser and makes it possible to get it all back. All you have to do is press Control-Shift-T (Command-Shift-T on a Mac) and Chrome will reopen any recently closed tabs. You can keep hitting it for more closed tabs working your way back through your browsing history.             

Easy Key Command to Delete Browsing History

If you ever want to delete your browsing history, including past URLs, cached images, passwords, and cookies, you can do that all through the clear browsing window in Settings. You can access it quickly by simply pressing Control-Shift-Delete and a "Clear browsing data" window will open. (Press shift-Command-Delete to access this function on a Mac).       
  

A Lot of Information Hidden in That Omnibox

If you didn't know, clicking the little star in the far right side of the omnibox will prompt a bookmark list, which allows you to easily add a site to your list of favorites (I honestly didn't know this until embarrassingly recently).

You may have also noticed on the far left of your omnibar a little icon that resembles a folded piece of paper or lock (to signify a secured site). If you click on it, it will prompt a window with all sorts of information about the site as well as permissions particular to that site, which you can then manipulate.


Drag Links Directly to Your Desktop

There's numerous ways to store and organize links to like to click on later. However, one method you may not be utilizing—or even aware of—is the ability to create a link icon directly on your desktop. All you have to do is highlight a URL from the omnibox and drag and drop it on the desktop. Chrome automatically creates a clickable icon that you can use later, or organize as you would like.               

Tuesday, 1 April 2014

Infinity Ward changes names of Ghosts playlists as an April Fool’s joke

BkGiyEnCcAIKvaU

Infinity Ward has updated the names of the playlists and game modes within Call of Duty: Ghosts as a April Fool’s joke. If you go on to Ghosts now, you can see some of the interesting names that they have decided to put for the modes. The playlists names will change back after tomorrow.
  • PEW PEW – Team Deathmatch
  • All The Guns – Gun Game
  • PCP – Cranked
  • Transfer – Blitz
  • Set Up Us The Bomb – Search and Rescue
  • YOLO – Search and Destroy
  • Sickness – Infected
  • Tags Or It Didn’t Happen – Kill Confirmed
  • Bro, Do u even cap? – Domination
  • New Shit – Drop Zone
  • Wolfpack of 1 – Free for All
  • Tic Tac Fo’ – Team Tactical
  • Booms of Plenty – Ground War

Tuesday, 25 February 2014

Back up with a Batch file

Back up with a batch file:
This batch file has a menu and an Unattended option.


I have created this back up with a menu i created this batch file for my own personal PC, but you may copy, paste and modify it to suit your own needs.

Points to remember when modifying
Use the correct user and drive letters and paths.
Email path directories will vary  from user to user and is also dependent on the email program used.
(For instance my email is  program is microsoft outlook and the data file -PST- is located in Outlook folder in root directory of my C: drive.- not standard but that is where mine is.)

copy from here


@echo off
@color F9
title DurbanGeek BACK IT UP 2.0


:MAINMENU
mode con: cols=50 lines=21
CLS
echo.
echo.
echo.    DURBANGEEK ~  IT Solutions  0711035273
echo.    Durbangeek Custom BACK IT UP Utility
echo.     **********Kenny Godfrey***********
echo.
echo.
echo.              A. Back Up Documents
echo.              B. Back Up Pictures
echo.              C. Back Up Email
echo.              D. Back Up Desktop
echo.              E. Back Up *****
echo.              F. Back Up *****
echo.              G. Back Up Google Drive
echo.              H. Back Up Everything (Unattended)
echo.              Q. Quit
:CHOOSEACTION
echo.
set /p userinp=    ^   Make your selection:
set userinp=%userinp:~0,1%
if /i "%userinp%"=="A" goto Documents
if /i "%userinp%"=="B" goto Pictures
if /i "%userinp%"=="C" goto Email
if /i "%userinp%"=="D" goto Desktop
if /i "%userinp%"=="E" goto *****
if /i "%userinp%"=="F" goto *****
if /i "%userinp%"=="G" goto Google Drive
if /i "%userinp%"=="H" goto Everything
if /i "%userinp%"=="Q" goto Quit
echo.Try Again...
GOTO CHOOSEACTION

:Documents
mode con: cols=128 lines=42
title BACK IT UP  2.0
echo ********* Please make sure  all Documents are saved and closed. *********
echo ********* Press a key to continue ********
pause
echo.    Backing up Documents !!!!!!!
xcopy  C:\Users\User\Documents\*.* H:\DGBackup\Documents\ /D/S/H/V/C/F/K/Y
echo.
echo.Documents back up completed :)
echo.
echo ************Press any key to return to the main menu*************
PAUSE 1>nul
GOTO MAINMENU
)
echo ************Press any key to return to the main menu*************

:Pictures
mode con: cols=128 lines=42
title DurbanGeek BACK IT UP  2.0
echo ********* Please make sure  all Pictures are closed. *********
echo ********* Press a key to continue *********
pause
echo.    Backing up Pictures !!!!!!!
xcopy  C:\Users\User\Pictures\*.* H:\DGbackup\Pictures\ /D/S/H/V/C/F/K/Y
echo.
echo. Pictures back up completed :)
echo Press any key to return to the main menu
PAUSE 1>nul
GOTO MAINMENU
)
echo ************Press any key to return to the main menu*************

:Email
mode con: cols=128 lines=42
title DurbanGeek BACK IT UP  2.0
echo ********* Please make sure  Microsoft Outlook is closed *********
echo ********* Press a key to continue *********
pause
echo.    Backing up Email !!!!!!!
xcopy C:\Outlook\*.* H:\DGbackup\Outlook\  /D/S/H/V/C/F/K/Y/Z
echo.
echo.  Email back up completed :)
echo.
echo Press any key to return to the main menu
PAUSE 1>nul
GOTO MAINMENU
)
echo ************Press any key to return to the main menu*************

:Desktop
mode con: cols=128 lines=42
title DurbanGeek BACK IT UP  2.0
echo.    Backing up Desktop !!!!!!!
xcopy  C:\Users\User\Desktop*.* H:\DGbackup\Desktop /D/S/H/V/C/F/K/Y
echo.
echo.  Desktop back up completed :)
echo.
echo.Press any key to return to the main menu
pause > nul
GOTO MAINMENU
)
echo ************Press any key to return to the main menu*************

:Google Drive
mode con: cols=128 lines=42
title DurbanGeek BACK IT UP  2.0
echo.    Backing up Google Drive !!!!!!!
xcopy  "C:\Users\User\Google Drive\*".* "H:\DGbackup\Google Drive\" /D/S/H/V/C/F/K/Y
echo.
echo.  Google Drive back up completed :)
echo.
echo.Press any key to return to the main menu
pause > nul
GOTO MAINMENU
)
echo ************Press any key to return to the main menu*************

:Everything
mode con: cols=128 lines=42
title DurbanGeek BACK IT UP  2.0

echo.     * * * * Backing up Documents !!!!!!! * * * *
xcopy  C:\Users\User\Documents\*.* H:\DGBackup\Documents\ /D/S/H/V/C/F/K/Y
echo.
echo.  Documents back up completed :)
echo.
echo.     * * * * Backing up Pictures !!!!!!! * * * *
xcopy  C:\Users\User\Pictures\*.* H:\DGbackup\Pictures\ /D/S/H/V/C/F/K/Y
echo.
echo.  Pictures back up completed :)
echo.
echo.
echo.    * * * * Backing up Email !!!!!!! * * * *
xcopy C:\Outlook\*.* H:\DGbackup\Outlook\  /D/S/H/V/C/F/K/Y/Z
echo.
echo.  Email back up completed :)
echo.
echo.
echo.     * * * * Backing up Desktop !!!!!!! * * * *
xcopy  C:\Users\User\Desktop*.* H:\DGbackup\Desktop\ /D/S/H/V/C/F/K/Y
echo.
echo.  Desktop back up completed :)
echo.
echo.
echo.     * * * * Backing up Google Drive !!!!!!! * * * *
xcopy  "C:\Users\User\Google Drive\"*.* "H:\DGbackup\Google Drive\" /D/S/H/V/C/F/K/Y
echo.
echo.  Google Drive back up completed :)
echo.
echo.
echo.  Unattended BACK IT UP up was completed :)
echo.Press any key to return to the main menu
pause > nul
GOTO MAINMENU
)
:Quit


 ↑ copy to here ↑


Instructions :
Open a new text docunent.
Paste  text into document
Select file then save as
Change the name to BackUp.bat (remove the .txt)and save to the desktop
The icon should look something like this             >>>>>

Now assuming that you have edited the commands correctly you will now be able to back up a folder or do a complete unattended backup.


Sunday, 19 January 2014

Windows XP end of support .. ( April 8 2014 )

What is Windows XP end of support?

Microsoft has provided support for Windows XP for the past 12 years. But now the time has come for us, along with our hardware and software partners, to invest our resources toward supporting more recent technologies so that we can continue to deliver great new experiences.
As a result, after April 8, 2014, technical assistance for Windows XP will no longer be available, including Microsoft Security Essentials for download on Windows XP on this date. (If you already have Microsoft Security Essentials installed, you will continue to receive anti-malware signature updates for a limited time, but this does not mean that your PC will be secure because Microsoft will no longer be providing security updates to protect your PC.)
automatic updates that help protect your PC. Microsoft will also stop providing
If you continue to use Windows XP after support ends, your computer will still work but it might become more vulnerable to security risks and viruses. Also, as more software and hardware manufacturers continue to optimize for more recent versions of Windows, you can expect to encounter greater numbers of apps and devices that do not work with Windows XP.
For more info on this visit Microsoft End Support Help
Durbangeek  ~ IT Solutions  |  Durban, South Africa  |  http://www.durbangeek.co.za 

Monday, 4 November 2013

Windows 8 / 8.1 ~ Reduce the number of programs running at startup

Reduce the number of programs running at startup If your PC is taking too long to boot, it’s probably because you have far too many programs running at startup.
Reducing this is easy, it will make your PC launch noticeably faster and lighter upon first load. To change the items running at startup, go to Run using the hotkey Windows key + R, and type "msconfig." A small window will appear (see the screenshot below), select the Startup tab.
 From here you will be able to turn off many startup programs, which can shave several seconds (or minutes) off your boot time. (Note Windows 8 has moved this functionality to the Task Manager). Try to make sure you research what you are turning off as some processes might be needed by third party programs or drivers you have installed.

Below: System configuration window (msconfig)


Here is a link to an older post Disabling startup items using msconfig or Ccleaner.
http://durbangeek.blogspot.com/2013/05/disabling-start-up-programs-in-windows.html

Tuesday, 22 October 2013

Lumia 2520: A tablet all its own


Lumia 2520: A tablet all its own


Nokia’s much-ballyhooed tablet device will reside in the market alongside Microsoft’s Surface tablets. The Lumia 2520 looks like an enlarged version of its phone siblings and runs Windows RT 8.1. It features a 10.1-inch 1080p display with high brightness and low reflectance, which Nokia says will make it easier to use in direct sunlight.

Lumia 2520


It’s equipped with a 6.7-megapixel rear-facing camera and a 2-megapixel wide-angle front-facing camera, as well as a 2.2GHz quad-core Qualcomm Snapdragon 800 processor, which is a bit of a departure from the Surface 2’s Tegra 4 chip. Nokia says that sticking with Qualcomm’s mobile chip should help improve startup times, as the tablet could take advantage of the processor’s fast-charging abilities. The 2520’s 8000mAh battery pack can charge up to 50 percent after just half an hour, though it requires an entirely separate port—and power adapter—to do so. This connection exists in addition to the USB 3.0 port (the same that Samsung uses on its latest, the Note 3) and a Mini HDMI-out on the side.

You can also buy a keyboard case, seemingly fashioned after the Surface’s, that has a “bouncy” Chiclet-style keyboard, an extra battery pack for an extra five hours of juice, and two USB ports. The case folds over like a Trapper Keeper and protects the Lumia 2520 from dust and scratches.
Lumia 2520
The Lumia 2520 will sport a keyboard cover not unlike that of Microsoft’s Surface.

Nokia hopes that integrated, out-of-the-box Office functionality—something that Apple and Google tablets don’t offer—will draw users to the 2520. But with both versions of Microsoft’s Surface tablets not selling well, and considering the fact that the tablet feels heavier than Apple’s iPad without the keyboard case, it’s not clear which part of the tablet market Nokia is gunning for here: the mobile consumer segment, or the professional productivity niche the Surface has managed to carve out.

Apps are coming, too


Today’s announcement finally puts Nokia and Windows Phone directly in the ring with the big competitors, Google’s Android and Apple’s iOS. And the company isn’t going into battle alone—Nokia also announced that more app makers have come on board the Windows Phone 8 platform. You’ll see popular apps such as Flipboard, Instagram, and Vine in the coming weeks, in addition to a few handwriting applications. “We want to keep bringing great applications to Windows Phone,” Majid said in our closed session. “There’s a little bit of a perception problem with the applications [Windows Phone 8 has now].” Some worthy applications—especially Instagram—may be in the pipeline, but whether consumers will be willing to leave the comfortable embrace of the platforms they know best will be another thing entirely.

The Lumia 1520 and Lumia 2520 will be available for purchase later this year. The 1520 will cost $749 before carrier subsidies. The 2520 will sell for $499 before subsidies, while the power keyboard accessory will cost $149.

Monday, 9 September 2013

Housekeeping with Ccleaner - How to Use the Cleaner and Registry options.

Lets do some Housekeeping with Ccleaner - Lets get started

1:Open CCleaner.


2: Lets Start off by cleaning your temp files, History Cookies Index.dat files etc. (By default the brush is already selected)

3:Uncheck the items that you'd do not want to clean out from your browser(s) and any suggested applications. Under Internet explorer check temporary internet files, cookies, and last download location. Most users don't really need this stuff. It is up to you if you want to clear the cache of  history and bookmarks Index.dat files. Leave Windows Explorer, System, and Advanced at the default settings.


4: Run CCleaner and it will start deleting files

 
 5:Click "Run Cleaner"  once again  until you get 0 bytes remove


Now that you have removed all the unwanted files you can move onto cleaning the registry

The Registry Cleaner

Use the Registry Cleaner after uninstalling programs, as the uninstalled programs will often leave behind incorrect registry entries. The registry cleaner is recommended for slightly more advanced users.
   
1:Click the Registry tab on the left hand side of the program window.


2:Check off the items want to clean.(leave at default if you are not sure)


3:Click the "Scan for issues" button at the bottom of the program.
 (Give the program a few moments to run and look for all potential problems with the registry.)
 
4: Click the "Fix Selected issues" button.
 
5: Create a backup copy of the registry file.  (I have never encountered a problem with ccleaner, its probably  one of the safest registry cleaners out there. Just create a back up for your peace of mind.)

6: Click the "Fix All Selected Issues" when a dialog box displays.
 
7: Now continue to repeat the process  from point 3 again until you get a message that reads "No issues found" ( Fixing one issue may create other issues so just repeat until you get the 'no issues found' )
 
8: You are now done and close your Ccleaner window.

Tools

Have a look at how to remove /disable unwanted start up items from your PC with Ccleaner.
Tools - Startup Tab

Tuesday, 3 September 2013

Fastest GTX780 in the world: MSI Lightning spy photos

Monday, 2 September 2013

Microsoft is doubling the storage capacity of inboxes for those using Exchange Online and Office 365

Microsoft is doubling the storage capacity of inboxes for those using Exchange Online and Office 365. The rollout from 25GB to 50GB is already under way and should be completed sometime in November according to a post on the Office 365 blog.


Customers using Exchange Online Plan 1, Office 365 Small Business, Midsize Business, Enterprise E1, Government G1 and Education A1 are among those that will see the mailbox capacity boost.
Those on one of Microsoft’s premium service plans (Exchange Online Plan 2, Office 365 Enterprise E3 and E4, Government G3 and G4, Education A3 and A4) already enjoy unlimited e-mail storage through their personal archive but now the default primary mailbox size is increasing to 50GB. It is worth pointing out there will be no extra charge for the additional storage and the transition will happen seamlessly behind the scenes.

Elsewhere, shared mailboxes and Resources mailboxes are both increasing to 10GB (more than double) and Kiosk user mailboxes are doubling in capacity from 1GB to 2GB. The size of Site mailboxes remains unchanged, Microsoft said.

The changes come just days after Microsoft tripled the file storage capacity on SkyDrive Pro. Office 365 and SharePoint customers previously were afforded just 7GB of storage but that’s now been boosted to 25GB.

Overall, the new storage limits push Microsoft ahead of Google Drive’s storage capacity that’s shared across Drive and Gmail. One has to wonder if the search giant will take notice and boost user capacity in response

Wednesday, 28 August 2013

Afrihost DNS issues - work around until issues are solved 28 August 2013


Afrihost ADSL clients may experience errors with Web Browsing, YouTube access, Sending & Receiving Email and other services due to a DNS error on MTN network.

Here is a solution until the issues are solved

If your router has Afrihosts DNS servers in it or its set on 'Obtain  DNS automatically' ,  Log into your router and change it to Googles DNS


Primary DNS: 8.8.8.8
Secondary DNS: 8.8.4.4

If your router is set on obtain automatically your can use an alternative method but will have to do this on each individual computer.

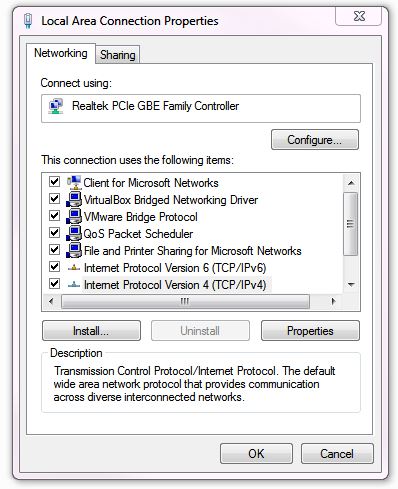
Go to your network adaptor (wireless or LAN  local area connection) settings right click select properties.Select  Internet protocol version 4 (TCP/IP v.4) >>> Click 'Properties'

Then select the radio button  'Use the following DNS server adresses:'  put in Googles Primary  & Secondary DNS settings mentioned above. Click okay and now you should have browsing and email access again


If you have any questions please leave comments.

Tuesday, 27 August 2013

Microsoft Office 2013 - Error opening word and excel files that have been downloaded or sent to you as attachments.


How to fix an error opening word and excel files that have been downloaded or sent to you as attachments in Microsoft Office 2013

 Below: Error message
 image thumb How to remove protected view from Office 2013 when downloading documents from the web

The message that has nothing to do with the actual problem, and the problem is actually a Microsoft feature, as often is:

- Office now has a  "protected-mode" feature, which prevents office apps from doing certain things under certain conditions.
- One of them is to stop excel / word from opening attachments coming from outlook.

Click the Microsoft Office ButtonButton image, and then click Word Options. or Excel  depending on what you having a problem with.
 image thumb2 How to remove protected view from Office 2013 when downloading documents from the web 

Below: Click Trust Center, and then click Trust Center Settings. image thumb3 How to remove protected view from Office 2013 when downloading documents from the web 

Below: Click the "Protected View"  in the left menu and untick all 3  check boxes on the right.
'
image thumb4 How to remove protected view from Office 2013 when downloading documents from the web

Save and voila, suddenly  word / excel can open all your files and has absolutely no problems with your gigs of free memory.
Thanks to the brilliant minds who conceived such an awkward feature with awkward error messages and ultra-deep menu options to clear - and of course no simple help. LOL